What better way to embrace the summer season than by hosting delightful gatherings with friends and family on your very own backyard deck? Let’s dive into how to build a backyard deck to make your dreams of outdoor entertainment come to life!
The sun-kissed days of summer are here, beckoning us to revel in the great outdoors. Get ready to soak up the sun, enjoy mouthwatering grills, and create lasting memories.
How To Build A Backyard Deck: DIY Decking Tips
Now, here’s the big question: should you embark on a DIY adventure or leave it to the pros? Doing it yourself means saving big bucks on labor costs.
But building a deck is no small feat, especially if you’re new to the game. Be sure to weigh your skills and determine if you’re up for the challenge.
1. Do Your Research
Reach out to your local city planner’s office and inquire about permits and building codes. You’ll want to play by the rules to ensure your deck is up to snuff (check out the article: do you need a permit to build a deck?).
Find out about height limits, size restrictions, and other essential details. If your deck’s on the smaller side or not too tall, you might be in luck and dodge the red tape.
2. Deck Planning
Now that you’ve got the green light, it’s time to map out the deck. Choose the perfect spot in your backyard, keeping accessibility and privacy in mind.
Here’s a savvy tip: have a backup plan just in case. Dial 811 to have those underground utility lines flagged before you start digging.
You’ve prepared, you’ve planned, and now it’s time to unleash your inner builder. A platform deck is a good starting point for beginners.
No need for specialized knowledge – just a knack for precision and a level head. Ensure your measurements are spot-on, and you’ll be basking on your deck in no time.
3. Budgeting For Your Dream Deck
A simple platform deck can set you back around $1,000, but as you add bells and whistles, the cost will naturally rise.
Be prepared for some hidden expenses like building permits (if needed), extra supplies, equipment rentals, and maybe even some fancy shrubbery for added privacy.
And don’t forget about maintenance – keeping your deck in tip-top shape requires some TLC.
4. Gather The Materials
If you’re working with a design, it should come with a handy supply list for the lumber and hardware required. But better be safe than sorry, so plan on getting some extras too – you never know when you’ll need a backup.
Now, here’s the drill – take a good look at all that lumber. Make sure it’s straight and in tip-top shape. Next up, time to choose your decking material.
Here are some options to consider:
-
- Cedar or redwood – a touch of natural beauty, but you’ll need to do regular maintenance as well.
-
- Pressure-treated wood – classic choice, but don’t forget that it requires yearly TLC with restaining and cleaning.
-
- Recycled plastic lumber – eco-friendly and low maintenance, but again, it can be a tad pricier.
-
- Composite lumber – easy on the upkeep, no resealing required, but be prepared to shell out a bit more upfront.
Each of these comes with its own set of pros and cons, so weigh them wisely.
Oh, and let’s not forget safety – grab yourself a dust mask and those safety glasses. Pressure-treated wood contains preservatives that can be a bit harmful if inhaled.
5. Lay Out Your Decking Plan
With a little string and some 2-inch wooden slats, we’ll set the perimeter and make sure everything’s on the straight and narrow. Got yourself a line level? Attach that to ensure nothing goes wonky as you build this deck of yours.
Now, let’s mark the location of those vital corners or posts with some spray paint (find out: can you spray stain on a deck?)
But don’t get too carried away – the number of posts depends on your local building codes and your deck’s size, so do your homework!
You might also be interested in checking out our top pick for the best deck paint.
6. Prepare Your Deck’s Underground
If you’ve got a low-lying platform deck, we’ve got a trick up our sleeves to keep things neat and tidy. Use ground cover sheeting!
Pop it over the space under your deck, but don’t forget to cut some openings for those footings. Staking it down, cover it all up with a generous layer of pea gravel, and we’ve got it all in place!
Not only does this save you from the task of digging up buried plastic sheeting later on, but the gravel also lends a hand in drainage.
7. Set A Solid Foundation
While pressure-treated wood can handle a bit of ground contact, we’ll leave at least a 1-inch gap between the ground and the bottom of your deck for some much-needed air circulation.
Now, the depth of those footings will depend on where you live and the frost line. Yes, it’s the point where the groundwater freezes, and we want to avoid any winter woes. So, get digging and make sure those footings go deep enough to withstand any frosty periods.
But, no worries if digging isn’t your thing! Grab a friend, head to your local hardware store or home improvement center, and rent a power auger.
Just keep in mind that some areas might require an inspection before you proceed, so check the local rules and get the green light.
8. Set The Footings
The pea gravel should be poured into the holes, concrete footer tubes positioned, and quick-set concrete filled into the gaps.
Now, let’s make sure everything’s plumb with the ground. Once that’s all sorted, time to place those metal saddles or anchor bolts.
And here’s the finishing touch – let the concrete cure, and you’ll have a foundation that’ll hold strong for years to come (if you are curious, check out: how long does a wood deck last?).
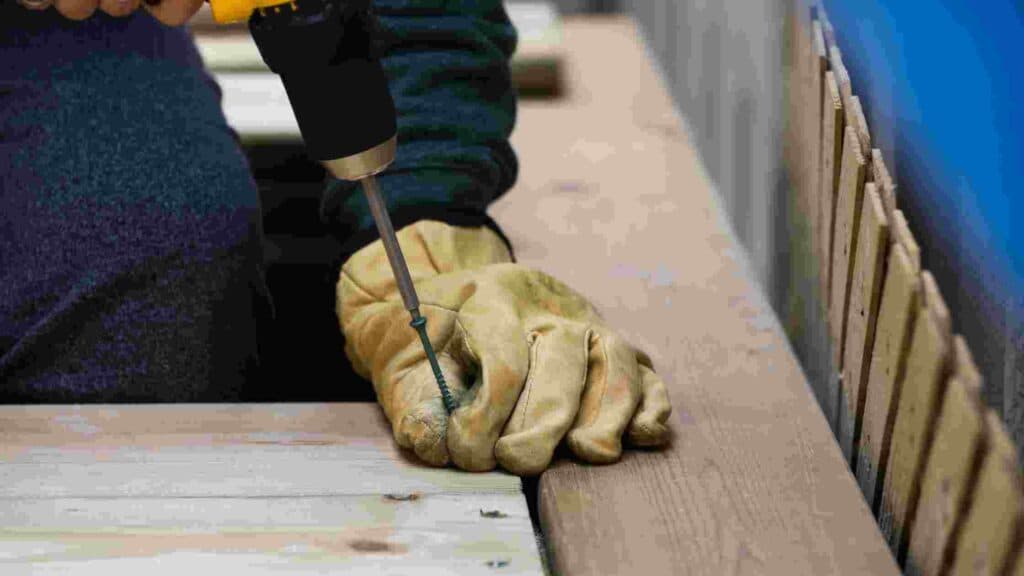
9. Lumber Cutting
Grab that cutting list from your deck plan and start prepping those pieces for the rim and support beams. But here’s the golden rule: measure twice, cut once! Following this advice will save you both time and money in the long run.
10. Building Up The Rim
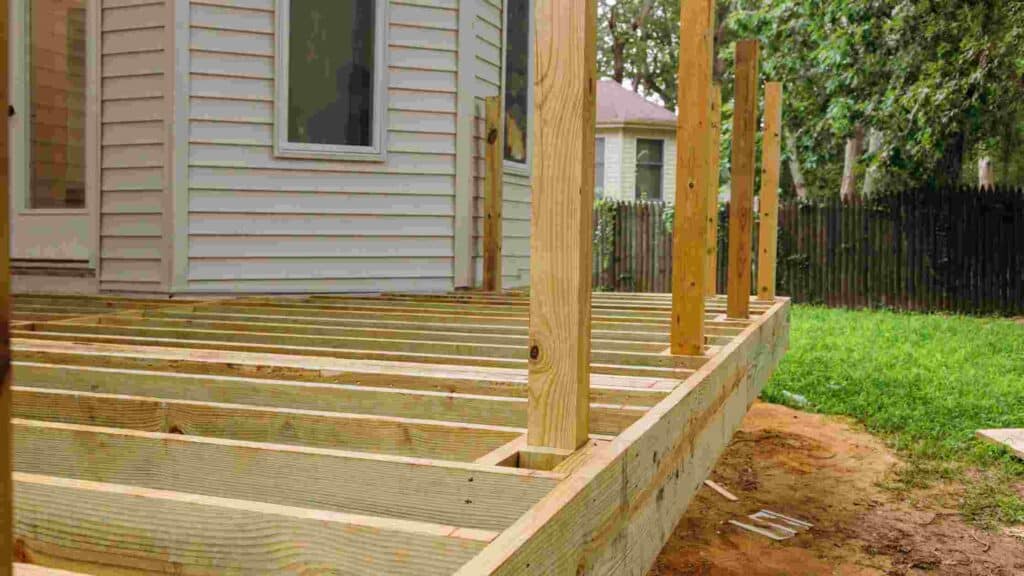
Take those prepared pieces and lay them out in the shape of your deck. Now, it’s time to connect the dots using angle brackets.
Add a second piece of wood to the mix and nail them together with some 16d nails. This will provide a reinforced structure that’s sure to stand the test of time.
And remember to always check that it’s level – a wonky deck just won’t do!
11. Joists And Hangers
Let’s get the joists and hangers in place to lay the strong foundation for your deck. Start those screw holes with a drill.
Now, screw those joists in at an angle, following your deck plan for the perfect spacing. Typically, they’re around 16 inches apart – just the right distance to hold everything together.
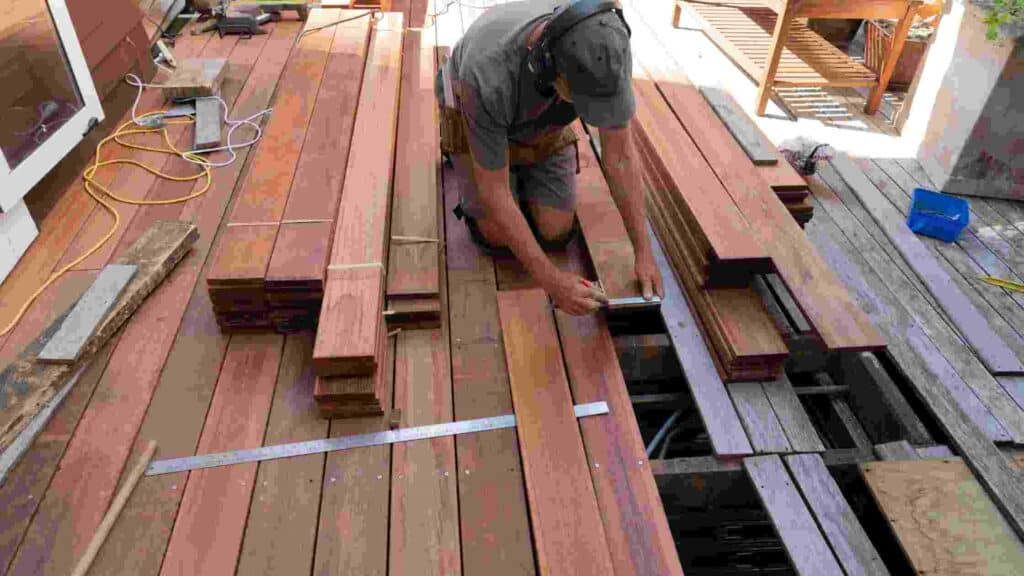
12. Add The Decking Material
Those piles of lumber are about to transform into your fabulous deck.
You’ve got two options here: hidden fasteners or decking screws. The choice is yours, but hidden fasteners have an edge – not only do they look sleek, but they’re less likely to pop out.
If you’re working with pressure-treated wood, it might still be a bit damp and hefty. But it’ll shrink over time and create the perfect gaps for water to drain off the floor.
And if you’re using dry wood or another material, leave about a 0.25-inch space between each piece for the needed ventilation below.
13. Attaching The Fascia
The fascia adds a classy touch, elevates your deck’s look, and keeps critters at bay (find out how to get rid of raccoons under the deck).
No more open spaces under your deck! Install the fascia and enjoy that polished and finished appearance it brings to your deck.
14. Trimming The Edges
The finishing touches are everything. Use a chalk line to snap the perfect overhang of the decking, and then unleash your circular saw to trim those edges to perfection.
Keep in mind that if you’re using pressure-treated wood, the ends won’t be protected from rotting. Grab a rasp and smooth them to make staining and sealing easy.
15. Maintaining The Wood
Your deck needs to be stained if you want to change up the natural wood color (here’s how often to stain deck).
If you used pressure-treated lumber, be patient and let it dry for a few months before applying the stain (you might also be interested in checking out: how long should deck stain dry before walking on it?).
For other materials, leave about 0.25-inch spacing between each piece to allow for proper ventilation under your deck.
Seal that wood to fend off insects, fungus, and mold – a little TLC will prolong your deck’s life and keep it splinter-free. Remember, it’s a yearly affair, but your deck will thank you for it!
What Do You Want Your Deck For?
Before you roll up your sleeves and get building, take a moment to envision your perfect deck. What’s its purpose? Do you see it as a lively hub for entertaining guests or a cozy oasis for family relaxation?
Perhaps you’re aiming for a spot to sunbathe and bask in the sun’s warm embrace. Define your deck’s purpose, and that will be the guiding light throughout your construction journey. Size matters too, so measure wisely!
Feeling a bit unsure about the design? No worries! Surf the web for captivating deck images and browse through a treasure trove of free deck plans online. These gems can spark your creativity and set you on the path to deck-building greatness.
FAQs
1. Is it cheaper to build a deck yourself?
Yes, building a deck yourself is generally cheaper than hiring a contractor, as it saves on labor costs.
2. What is the cheapest way to build an outdoor deck?
The cheapest way to build an outdoor deck is by using pressure-treated wood and opting for a simple design without extensive features.
3. Can I build a deck by myself?
Yes, you can build a deck by yourself, but it requires careful planning, research, and basic carpentry skills.
4. How to build a raised deck attached to house?
To build a raised deck attached to a house, you need to create a sturdy foundation, secure ledger boards, and follow local building codes.
5. Can I build a deck directly on the ground?
Yes, you can build a deck directly on the ground, but it’s essential to use proper materials and ensure adequate drainage to prevent rot and decay.
6. How to build a flush ground level deck?
To build a flush ground-level deck, you’ll need to excavate the area, create a stable base, and construct the deck frame at ground level.
7. How to build a small deck platform?
Building a small deck platform involves measuring and leveling the area, setting the support posts, and assembling the deck frame and surface.
8. Are there any DIY deck kits or a floating deck kit?
Yes, there are DIY deck kits and floating deck kits available, which provide pre-cut materials and instructions for easier construction.
Conclusion: How To Build A Backyard Deck
To build a backyard deck, plan the design, get permits, clear the area, and create a strong foundation with concrete footings or piers.
Construct the frame using treated lumber, attach it securely to your house, and add deck boards. Install railings and stairs for safety, apply a weather-resistant finish, and maintain it regularly.
Embrace the DIY spirit and watch your deck come alive in a weekend of crafting fun. So, grab some outdoor furniture, hang up those twinkling lights, and let the good times roll on your fantastic deck creation!